How to install Doom on the Raspberry Pi
In this guide we'll be installing Crispy Doom. It has some enhancements to the original one, such as an uncapped framerate.
I am assuming you already have your Raspberry Pi up and running. If not, you can find a guide here.
Update 2020-04-22: I have written a script that does the steps below automatically. Open a terminal and enter(or copy & paste):
wget https://joppiesaus.neocities.org/div/install-crispy-doom.sh
bash install-crispy-doom.sh
When it's done and everything went well, crispy-doom is installed and DOOM1.WAD is downloaded. Instructions how to run and such(and comments) begin at the the recommended OpenGL step below.
In case you want to do it manually or the script breaks, here is the normal guide:
Ok, let's begin. First we must make sure we have the latest and greatest software, open a terminal and enter(or copy & paste):
sudo apt update
sudo apt upgrade
We're going to compile it ourselves. Keep in mind this guide is from late 2019, so if that's really old, consider following the instructions on the github page.
First, we need to install the libraries and tools and such required(you likely have a lot of these installed already):
sudo apt-get install libsdl2-mixer-dev libsdl2-dev libsdl2-mixer-dev libsdl2-net-dev zlib1g-dev git libpng16-16 build-essential automake
Go to the folder you want to have it, and enter:
git clone https://github.com/fabiangreffrath/crispy-doom
This will download the crispy doom code. go into the directory like this(Tip: hit tab to auto-complete, for example when typing cd crispy, you can just hit tab and it will autocomplete):
cd crispy-doom
Now we need to configure the script that will generate the configure script that will generate instructions in order to compile the crispy doom code... Yes that sounds really complicated, but that doesn't matter because you can just copy all the commands!
autoreconf -fiv
generate compile instructions(called a Makefile):
./configure
compile(this might take a few minutes):
make
Install:
sudo make install
Congratulations, Crispy doom is now installed! Now it's time to acquire a WAD("Where's All the Data"). It contains levels, textures, sounds and such. If you do not have one, you can download one like so. It's the shareware WAD, it has the first episode of the original doom:
wget http://www.doomworld.com/3ddownloads/ports/shareware_doom_iwad.zip # download
unzip shareware_doom_iwad.zip # extract
rm shareware_doom_iwad.zip # remove no longer used zip
If it is for some reason down, you can use this instead:
wget http://cdn.debian.net/debian/pool/non-free/d/doom-wad-shareware/doom-wad-shareware_1.9.fixed.orig.tar.gz
tar xzf doom-wad-shareware_1.9.fixed.orig.tar.gz
mv doom-wad-shareware-1.9.fixed/doom1.wad ./DOOM1.WAD
rm -rf doom-wad-shareware-1.9.fixed/ doom-wad-shareware_1.9.fixed.orig.tar.gz
OpenGL shenanigans
Now comes an optional, but strongly recommended step: to enable an OpenGL driver. By default the Raspberry Pi does software rendering, which means CPU renders it and the GPU isn't doing anything. It will make doom run much much smoother, even with high resolution rendering enabled(640x480 runs without any hiccup!), and it will reduce load on your CPU.
Go into sudo raspi-config, go to 7 Advanced Settings, then A7 Open GL driver(or something) and then G3: GL full KMS and hit enter. Close raspi-config and then reboot by typing sudo reboot
Now, finally, we can run crispy doom!
crispy-doom -iwad DOOM1.WAD
You can also access "crispness" settings within the game in the bottom of the options menu(which itself is in the main menu), this is what I use:
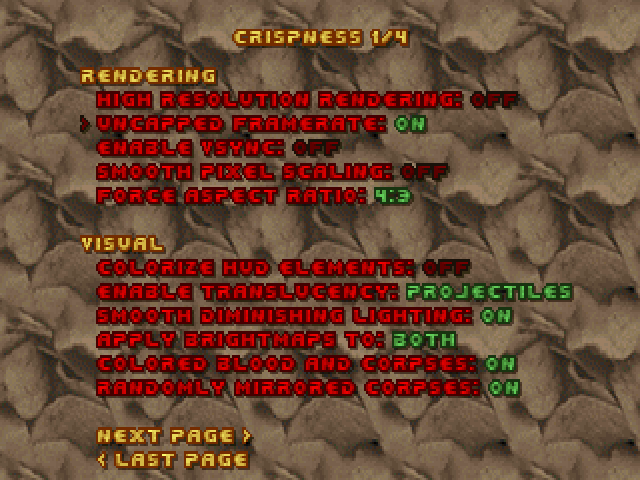
What's also possible is to go into crispy-doom-setup and change for example the screen size. This will make your game run smoother, at the cost of a lower resolution. If you're beeing flooded with "ALSA underrun detected" or something, you can also disable sound here to fix that.
This guide has been tested with the Raspberry Pi 3 Model A+ with Raspbian. On fullscreen, you can get playable framerates(something around 30 FPS I think). On 640x480 you can select the beefiest settings and it runs amazingly smooth. I also tested this on the old model B at 800 MHz(a modest overclock which I suggest you apply if possible, it'll make things run a little faster). Compiling took 20 minutes, but it has playable framerates even above 30 FPS, but it's inconsistent and you get dips below that now and then.
That's it for the guide. You can do something else now, or continue reading if you would like to read more about my experience with the Raspberry Pi.
Some background
In 2012 I found out about the Raspberry Pi and I thought it was really cool, a tiny computer. I ordered a model B and I did some stuff on it. It was my first encounter with Linux. I found it really cool and fascinating. At middle school I participated in a computer class. At the time we got binary and hexadecimal, and since I mostly knew it already because I made binary adders with redstone in Minecraft, I instead played games on it, such as micropolis, and of course, doom.
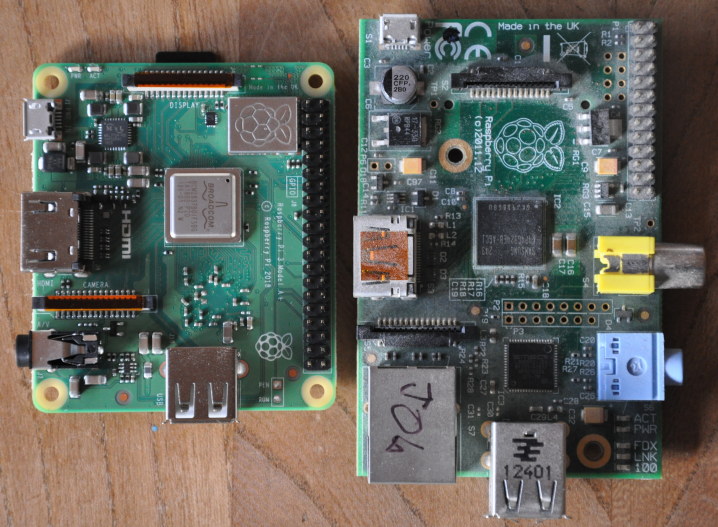
Recently I wanted to make a CO2 sensor for my room, and I the old model B still lying around. However, it has no Wi-Fi, and I only have one ethernet cable which my PC already uses. So I ordered this one. It also has Wi-Fi IEEE 802.11ac, something my router doesn't even have lol.
It looks a lot more polished than the old model B: it has rounded edges and a higher component density. It also feels nice to the touch. The CPU has a metal package, opposed by the plastic package of of the Model B. This makes sense because the A+ has a much faster CPU, a 64bit ARM Cortex-A53 with double the clockspeed of the model B: a 32 bit ARM11 at 700 MHz. It feels nice and warm when you touch it during running. I don't know if that's a good idea but I am doing it anyways. Also, the CPU is still stacked onto the RAM, and both have 512 MB RAM. Keep in mind the A+ model is cheaper than the model B at time of release.
The experience is more polished, too. Earlier I had to download a special program to write the OS to the SD card. Now you can just extract it. The software guides you through the whole process. And it's much faster, and it's a delight to use in my opinion. And this isn't even the most powerful one. Before you had to be really patient.
On the Raspberry Pi 3 A+, windy.com works, albeit laggy. My front page with the background and stuff also runs, 20-30 FPS I think. This really surprised me. Unlike the old model B, you can also play youtube videos at a low resolution. What also surprised me that some sites(such as sourceforge) that really don't look complex at all(and shouldn't be) take ages to load and lag the entire thing out, even with the out of the box installed uBlock. That also really surprised me. The default of the modern web.
Creating doom maps or WADs is also possible on it. It's actually great to use: everything runs snappy and smooth.
wget https://joppiesaus.neocities.org/div/eureka-1.24-source-rpimod.tar.gz # get the tarball
tar xzf eureka-1.24-source-rpimod.tar.gz # unpack it
cd eureka-1.24-source-rpimod # go into the directory
sudo apt-get install libfltk1.3-dev zlib1g-dev xdg-utils # install a bunch of requirements
make # compile the thing
./eureka # run the thing
What I also like about the Raspberry Pi is that it is completely quiet. It doesn't make noise, and it seems to calm me a little. And it also consumes less energy of course.
While the Raspberry Pi was originally designed to teach children programming, I think it's much broader than that, it's more of a small PC that can also interface with other hardware. Learning to program is possible on any capable computer. I think a fun device to learn programming on is something like the BBC micro:bit. I sure had a fun time using it, even though I already know the basics on how to program.